
Guides_
Behind the scenes: building our new SaaS website in Framer
We’re excited to launch our new website! Our product outgrew our old website, so we built a whole new website that better communicates how you can build on-brand calculators, forms, and funnels without having to code.


Guides_
Behind the scenes: building our new SaaS website in Framer
We’re excited to launch our new website! Our product outgrew our old website, so we built a whole new website that better communicates how you can build on-brand calculators, forms, and funnels without having to code.
Guides_
Behind the scenes: building our new SaaS website in Framer
We’re excited to launch our new website! Our product outgrew our old website, so we built a whole new website that better communicates how you can build on-brand calculators, forms, and funnels without having to code.
When I joined the team last year and started working on improving parts of the existing website, we quickly realized we had outgrown the current website in terms of branding, content, design, editor experience, and expandability. This is especially true as we’re working hard on improving big parts of our core product and building out many new features.
We took a good look at what we wanted our messaging to be and built a new website that better communicates how you can build on-brand calculators, forms, and funnels that automate your marketing and sales efforts without having to code.
Building it using Framer helped us ship and iterate on it faster. Thinking about the strategy for our new messaging, redesigning and rebuilding a completely new website from scratch, and migrating all our existing content were done by just one designer and one content writer, with help from one of our co-founders. No engineers were needed—something that truly fits our ethos with our no-code builder at Convert.
Consideration 1: Using code or no-code
Redesigning and rebuilding a website is a huge project. Our website consisted of a React + Next.js stack, powered by our own CMS for our 100+ dynamically created pages that score great on SEO and help potential customers find our website.
For our new website, we took a hard look at how we wanted to build it. We mainly asked ourselves what was right for our business. We had three options:
Build a new front-end in-house and keep using the current CMS. To do this, we expected one of our engineers to work on the website for four to six weeks. As we’re a pretty small team and are building big updates to our core product, relocating engineering efforts didn’t feel like the right choice.
Hire a freelancer to build the front-end. This felt like a great option, but it was expensive, and we’d still need our engineers to expand or fix bugs on the website when needed. It would solve our first relocation problem but didn’t solve this in the long run as we’re not planning to grow our team significantly.
I design and build the website using a no-code platform like Webflow or Framer. This would mean no relocation of engineering, making the team smaller would help to focus on going fast and reduce alignment meetings. Using a no-code tool would also mean less time designing and more time figuring things out while building.
Option 3 seemed like the quickest and most scalable option, and as we’re in the no-code space ourselves, we knew that a good Webflow or Framer website would give us the same quality as building it ourselves.
Consideration 2: Webflow or Framer
While comparing Webflow and Framer, we noticed a big difference:
In Webflow, you’re visually writing CSS. It’s easier than writing code but feels as powerful. However, the learning curve of doing it visually still feels pretty high, and besides basic HTML concepts like the box model, you have to focus on a lot of web knowledge that you’re not focussing on in Figma. Framer seems to have built an abstraction layer on top of HTML, CSS, and Javascript concepts that look a lot like Figma. Their interpretation of CSS Flex (called Stacks) and Grid feels like you’re working with Figma’s Auto Layout, but generates high-quality code for you.

When building a website, you usually go through two steps:
Design
Build
It felt like Webflow moved the second step from an engineer to a designer. Framer, however, merged the two steps and improved my speed tremendously.
Before we went all-in on Framer, we wanted to be sure it could meet a few of our needs, so we built demos solving the challenges below.
Challenge 1: Preparing for SEO
The basics
SEO is a big part of our growth strategy. On our old website, we had lots of pages and links that ranked well and helped customers find us.
We quickly learned that Framer is great in doing the basic things that are important for SEO: generating sitemaps, structuring headers using HTML tags and using semantic HTML tags for content blocks like <nav>, <aside>, etc., and editing meta descriptions.
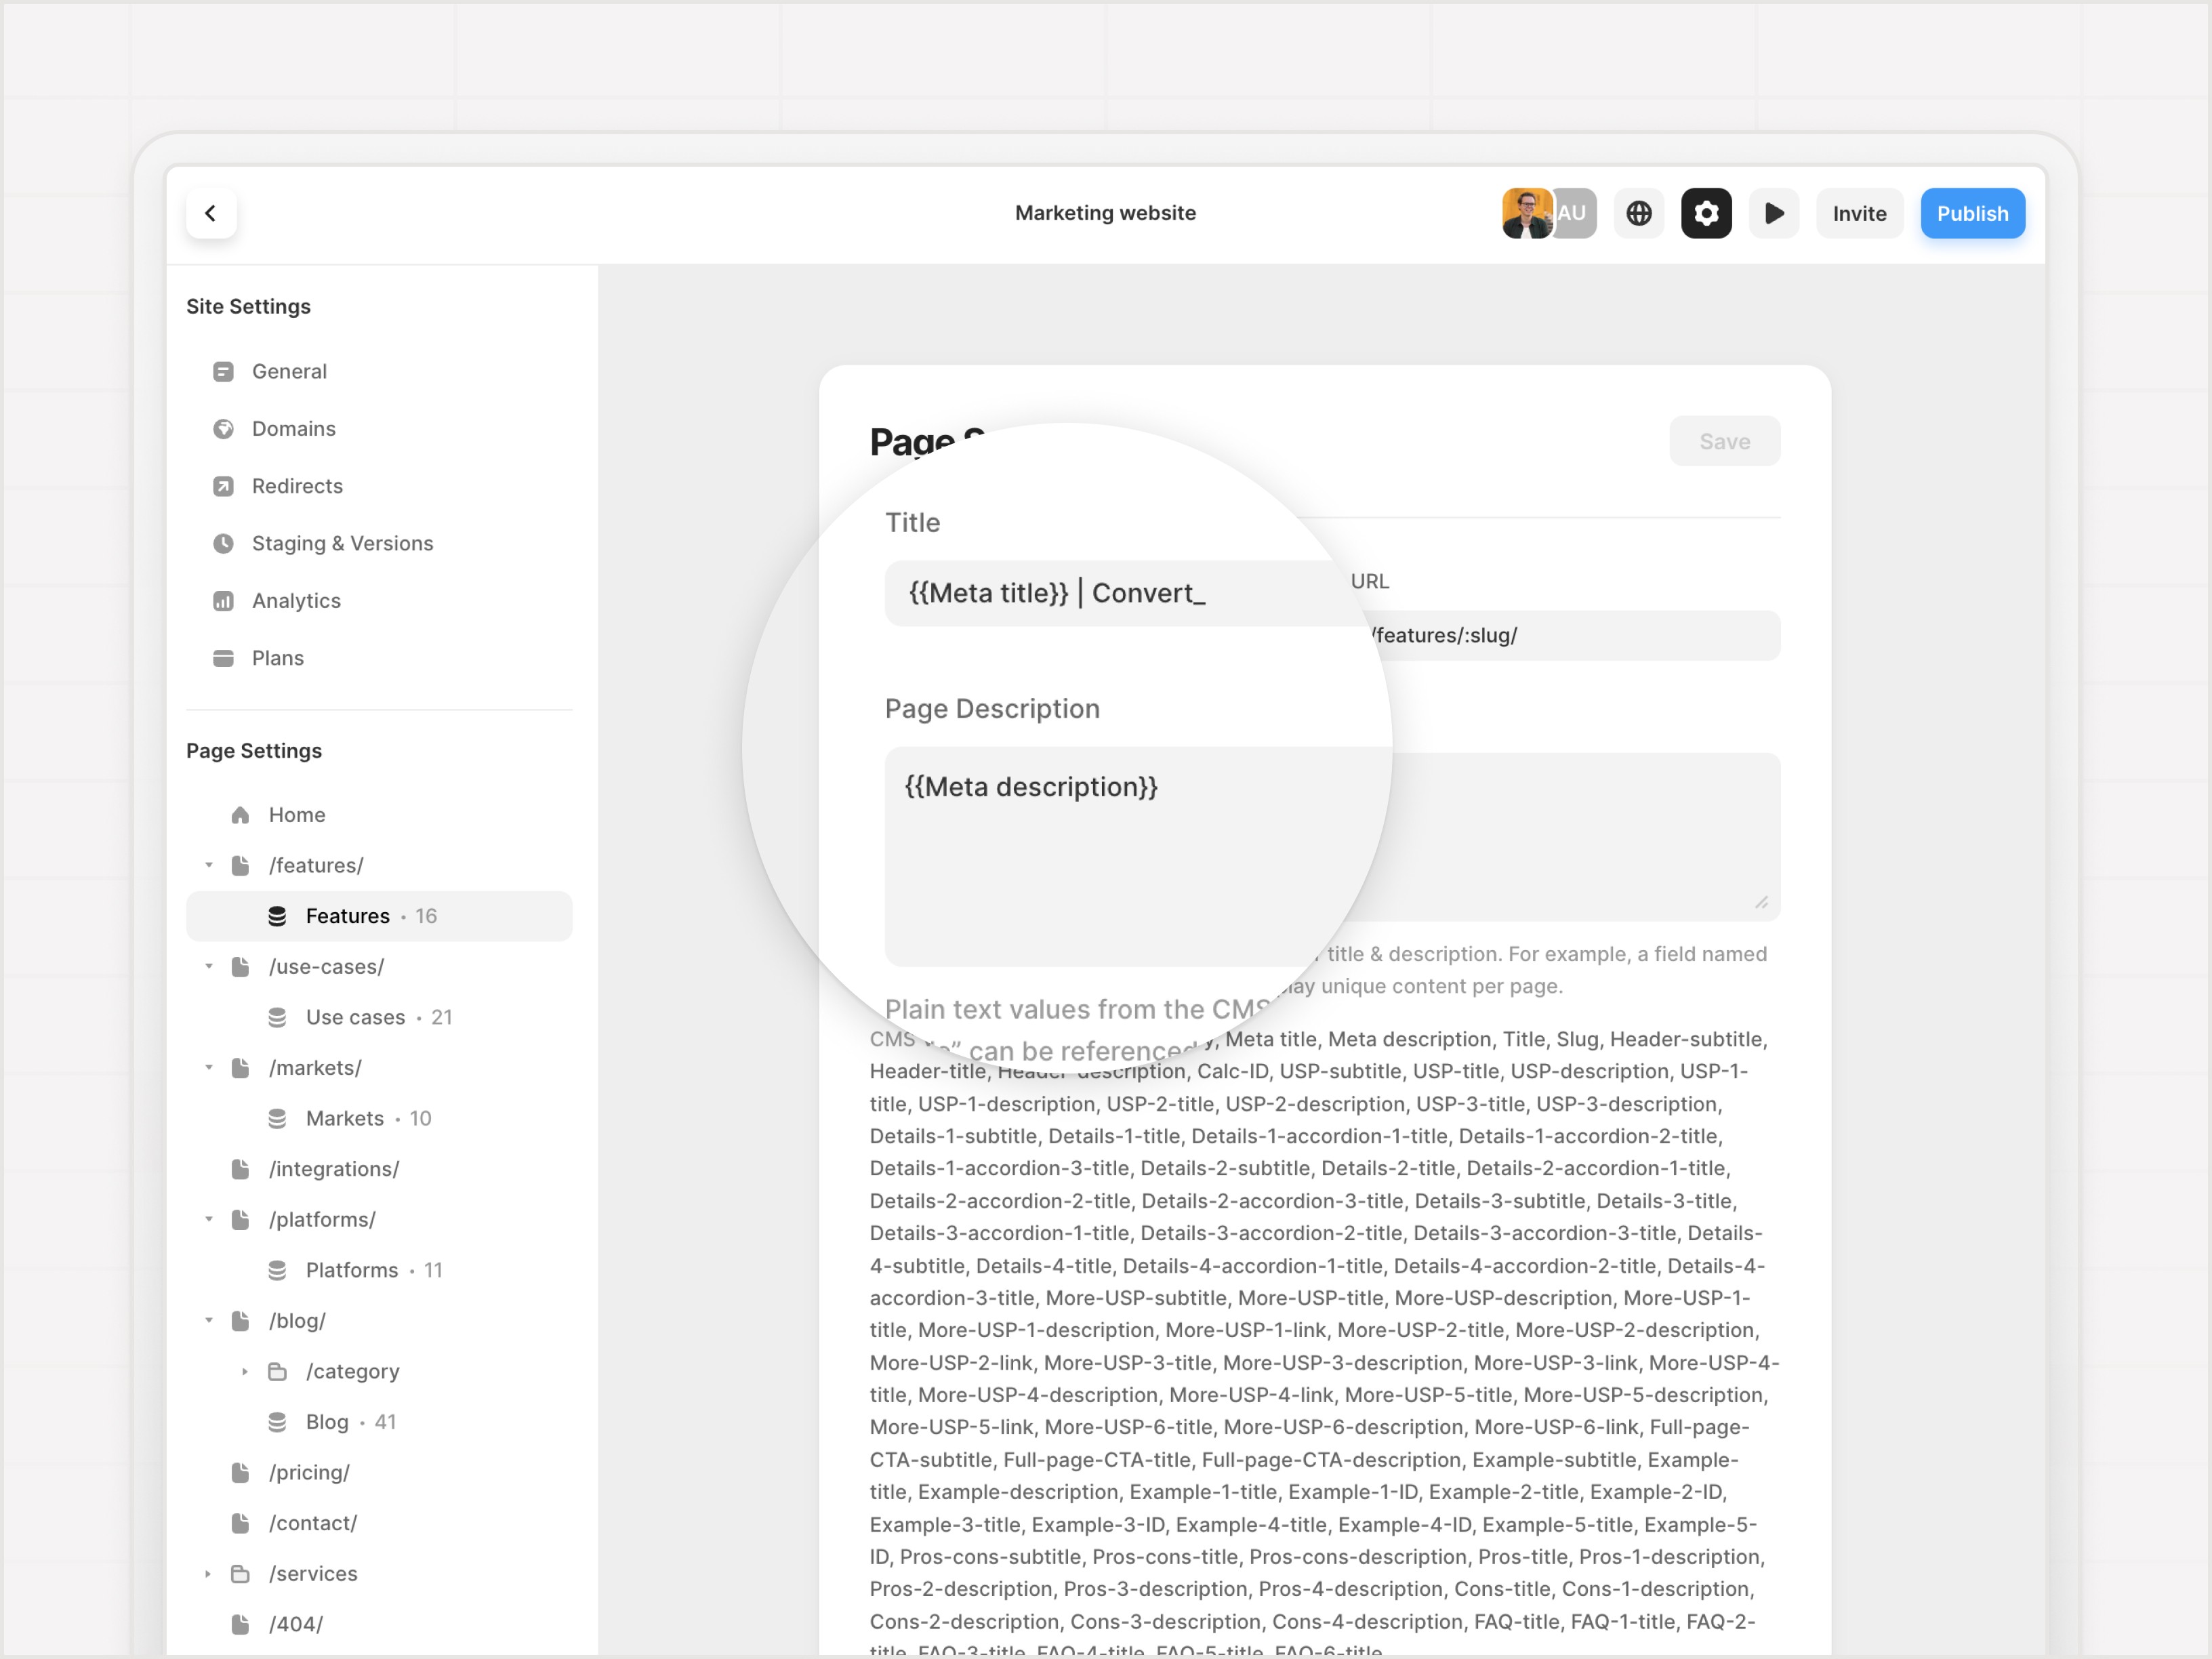
Custom meta titles and descriptions for CMS pages
Framer makes it easy to write dynamically created Meta Titles and Descriptions for CMS pages using CMS Variables. This is great because you can reuse content from your page to create unique descriptions.
For our website, we already had unique descriptions for each page. Even though it was more work, writing unique and descriptive copy helped our SEO. Framer doesn’t offer completely custom meta titles and Descriptions for CMS-generated pages. Still, it's possible to add a meta title and meta description field to your CMS collection and add them to the Page Settings using the Variables.
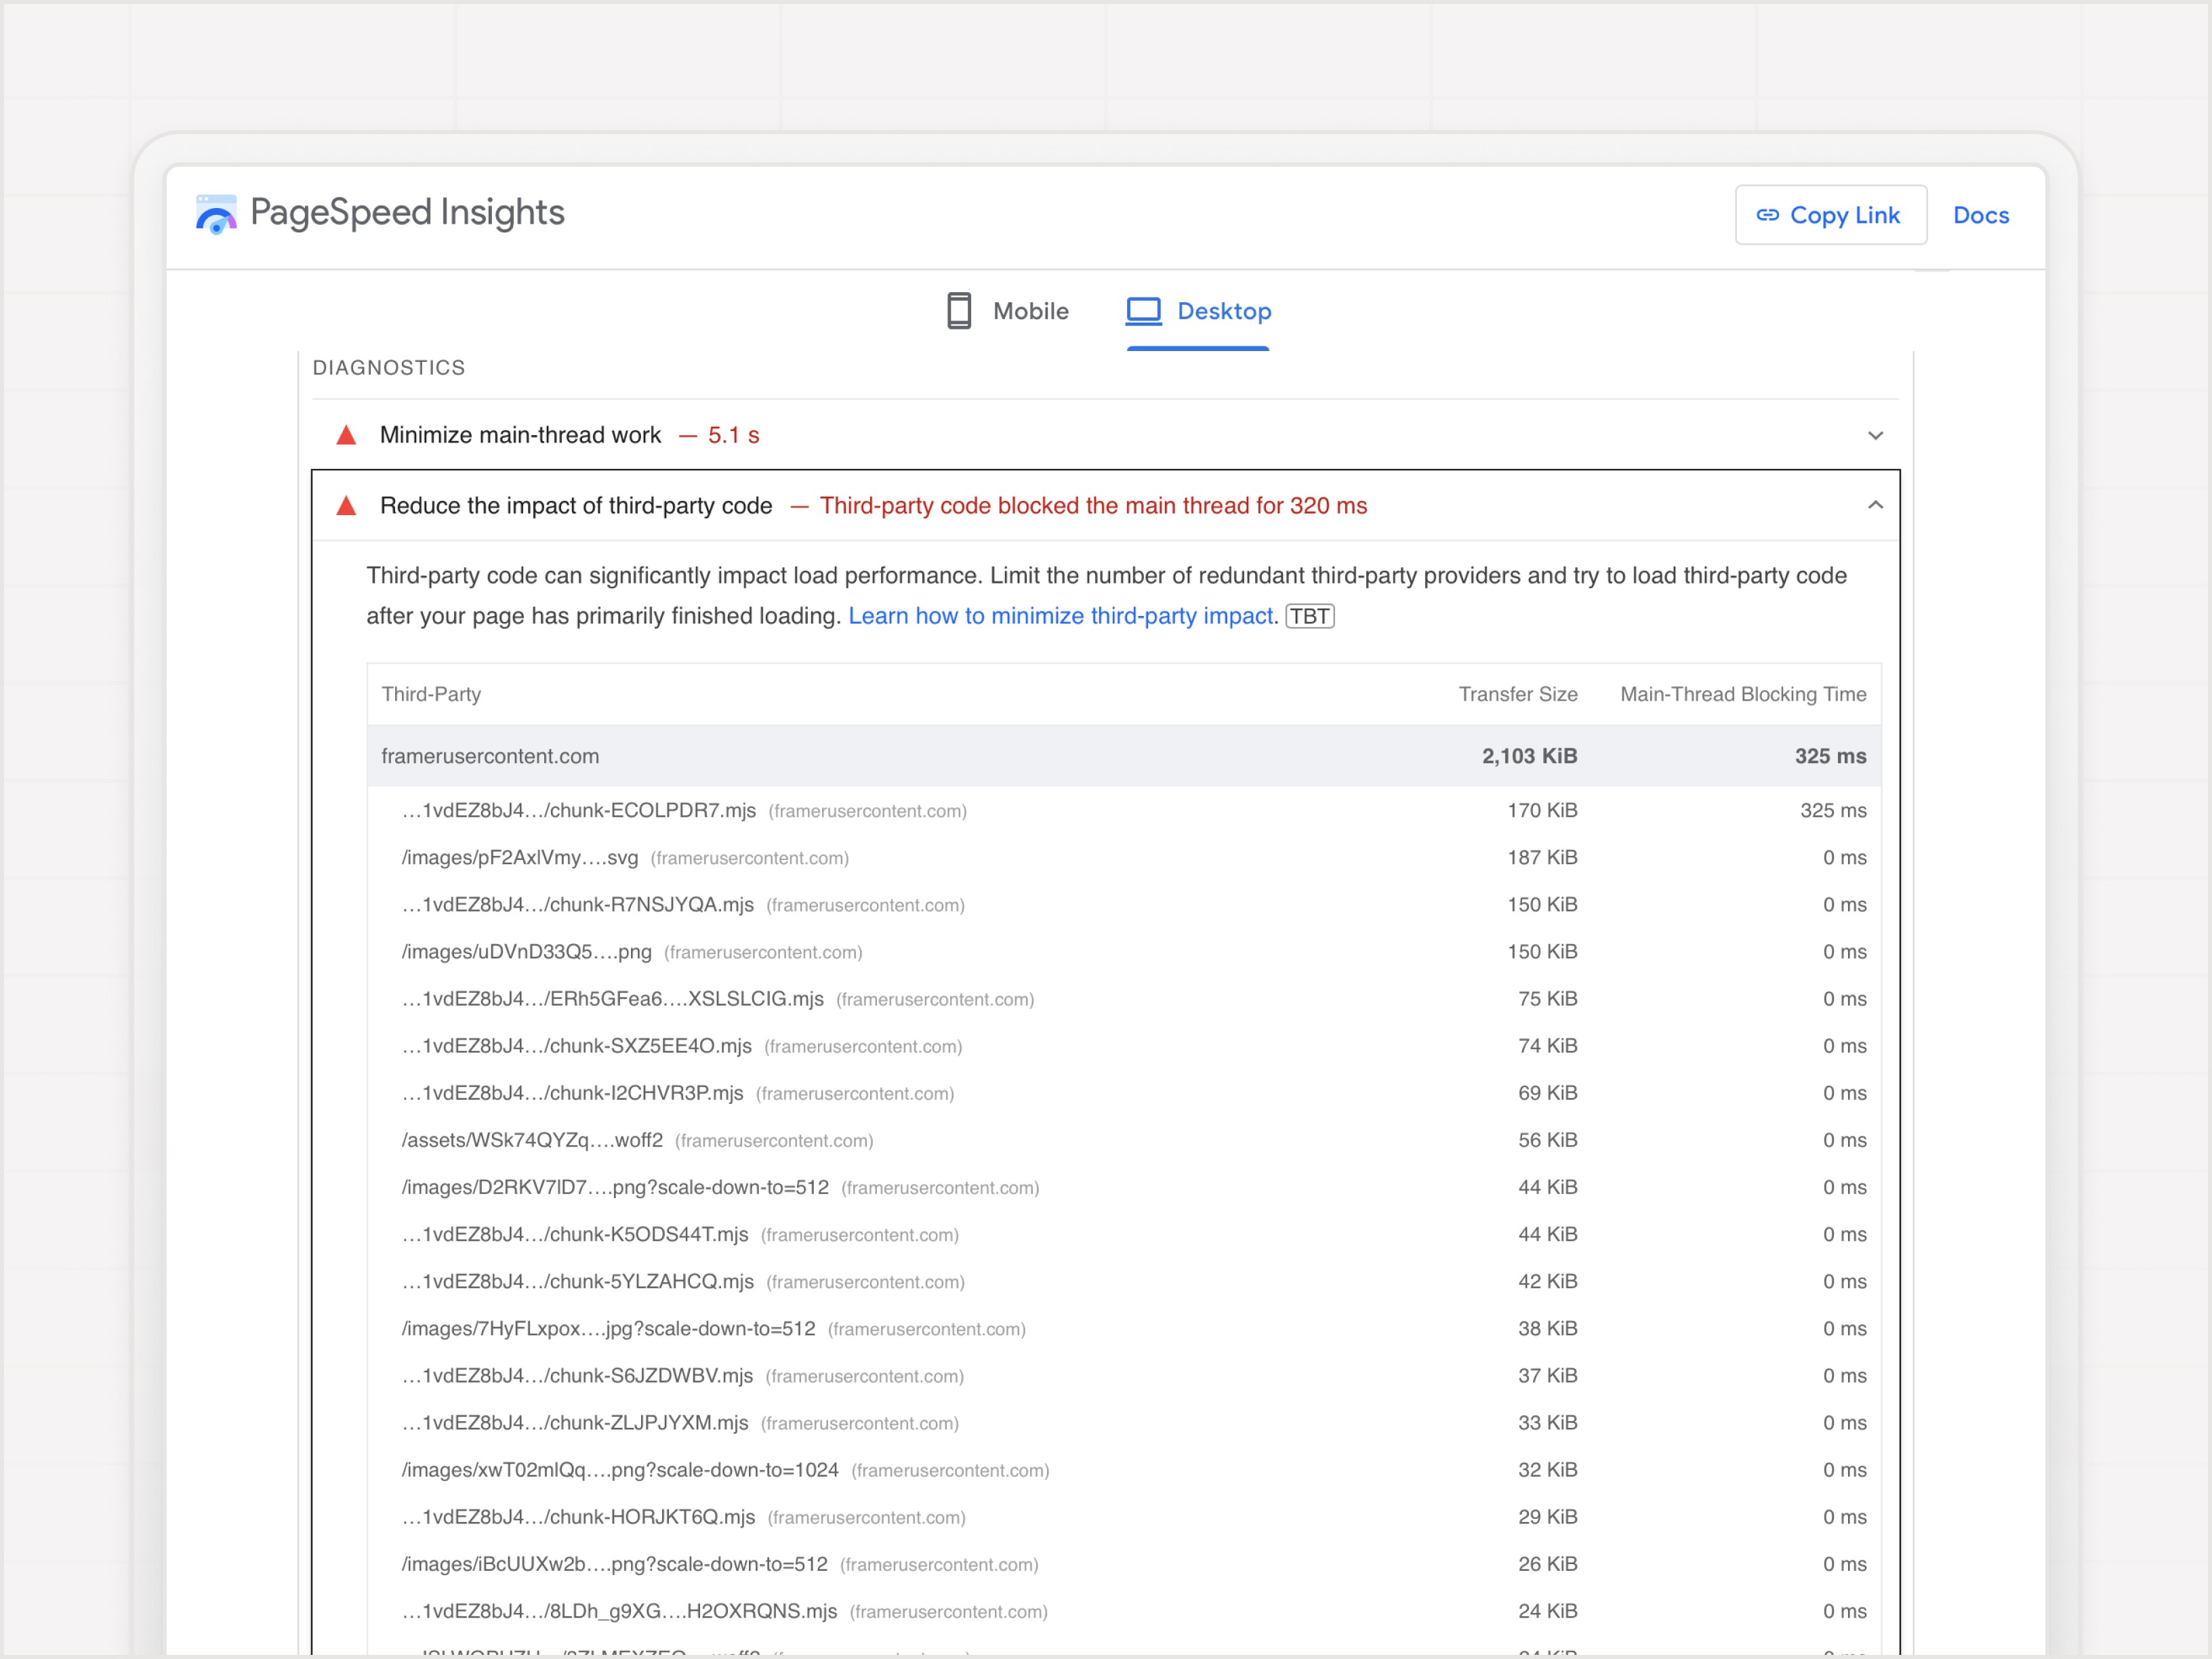
Lighthouse scores
Framer wrote a great guide on Lighthouse, Pagespeed Insights, the (SEO) performance toolset by Google, and interpreting its scores. After running several tests and fixing some scores, we found that Framer performs great for “Best Practices” and “SEO”:

“Performance” is hard to get high scores on, especially when you’re running the Lighthouse Chrome extension on mobile. Framer writes about this in their post linked above. The main reason for the lower scores seems to be all the Javascript that you can’t optimize yourself.
Ahrefs launch checklist and scores
Before we launched, we used this checklist from Ahrefs, which helped us ensure we covered everything important for great SEO.
After launch, we used the Ahrefs health check to find and solve all of our SEO issues: after some fixing, our new website scored 96%.

Of course, we have to wait to learn how Framer will work out for our SEO in the long run. We expect a dip in our ranking and traffic in the beginning, even though we read about companies like Whereby that saw an increase.
Challenge 2: Generate dynamic CMS pages using a lot of different components
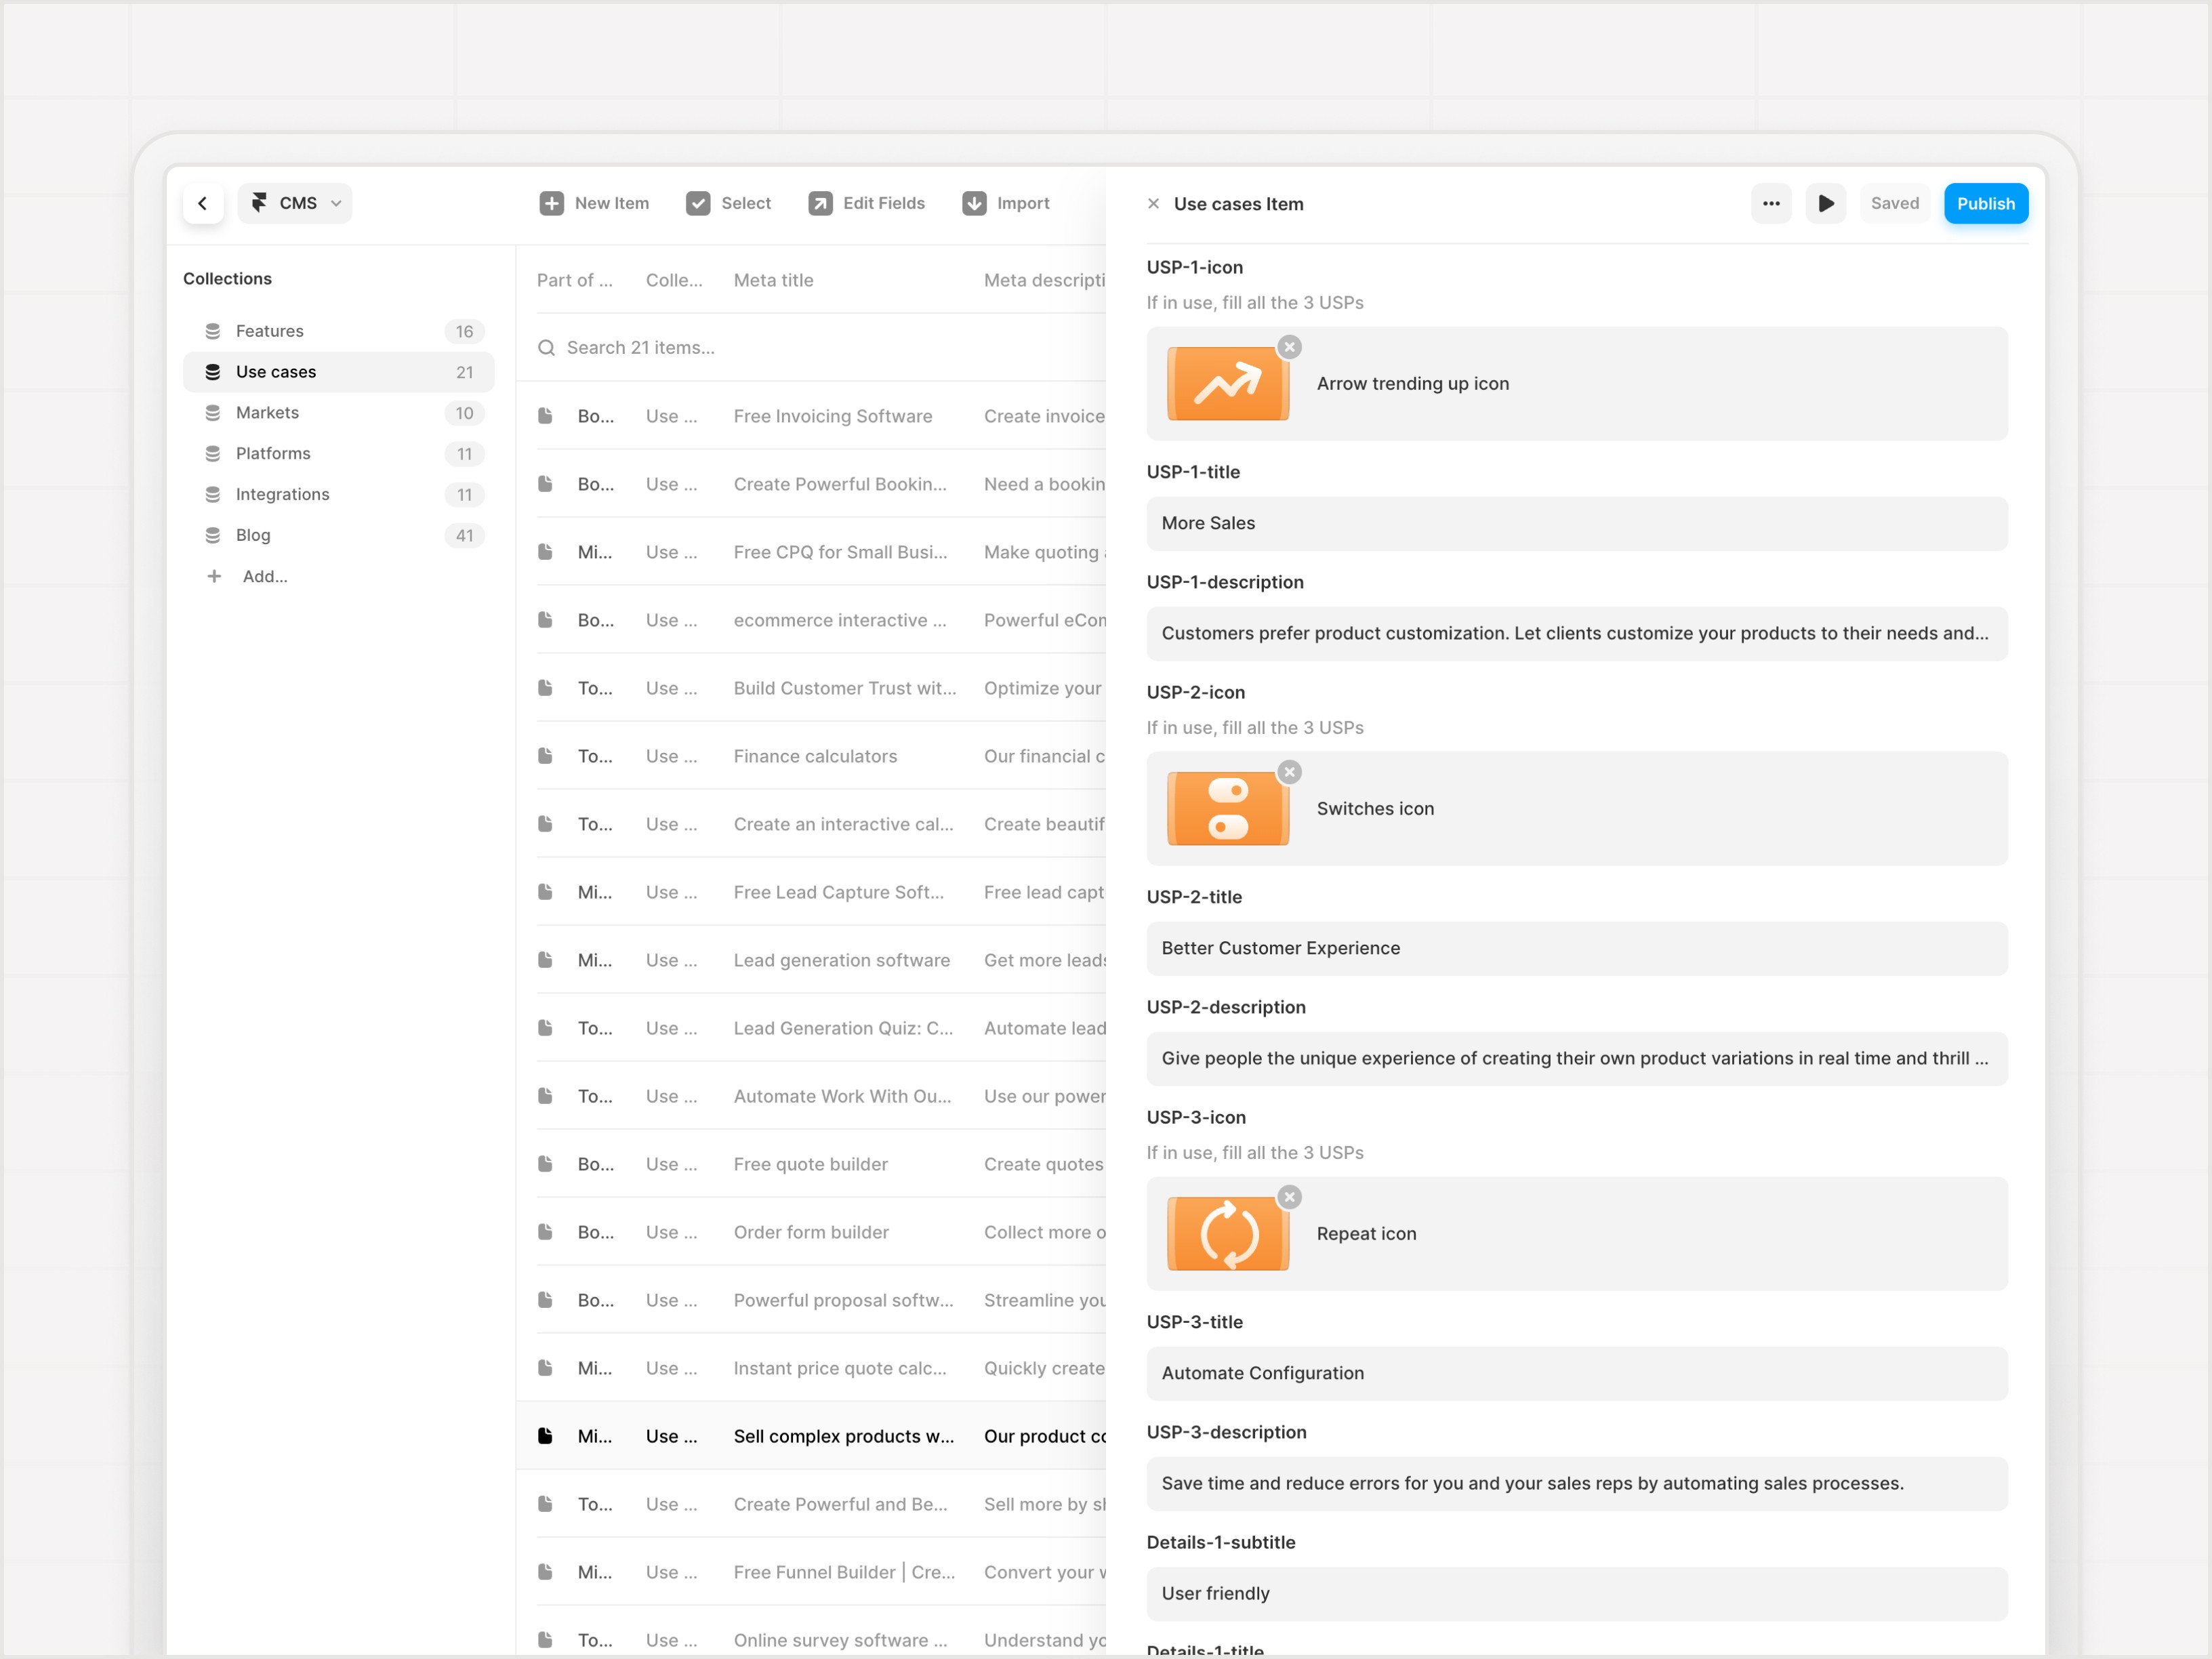
On our previous website, we published a lot of dynamically generated CMS pages that were important for SEO. These were grouped as features, use cases, markets, and platforms.
We were able to create pages by stacking components appropriate to each group and filling them with content. This gave us a lot of flexibility to create layouts that responded to the page's content needs. It allowed us to create reader-friendly pages that weren’t too text-heavy.
We quickly learned that Framer doesn’t support this out of the box, so we created a workaround using page templates and conditional logic.
We started building a set of versatile components based on the content we already had on our old website. For each content item in the component, whether it’s plain text, rich text, a link, an image, video, or an inline calculator or form that’s built with our tool, we created a CMS field and mapped this to the layer on the canvas. Using Framer’s ‘Visibility Conditions’, we were able to create conditionals that checked if a specific field in the CMS was filled, and based on it being true or false, it showed or hid the layer or complete component in the canvas.
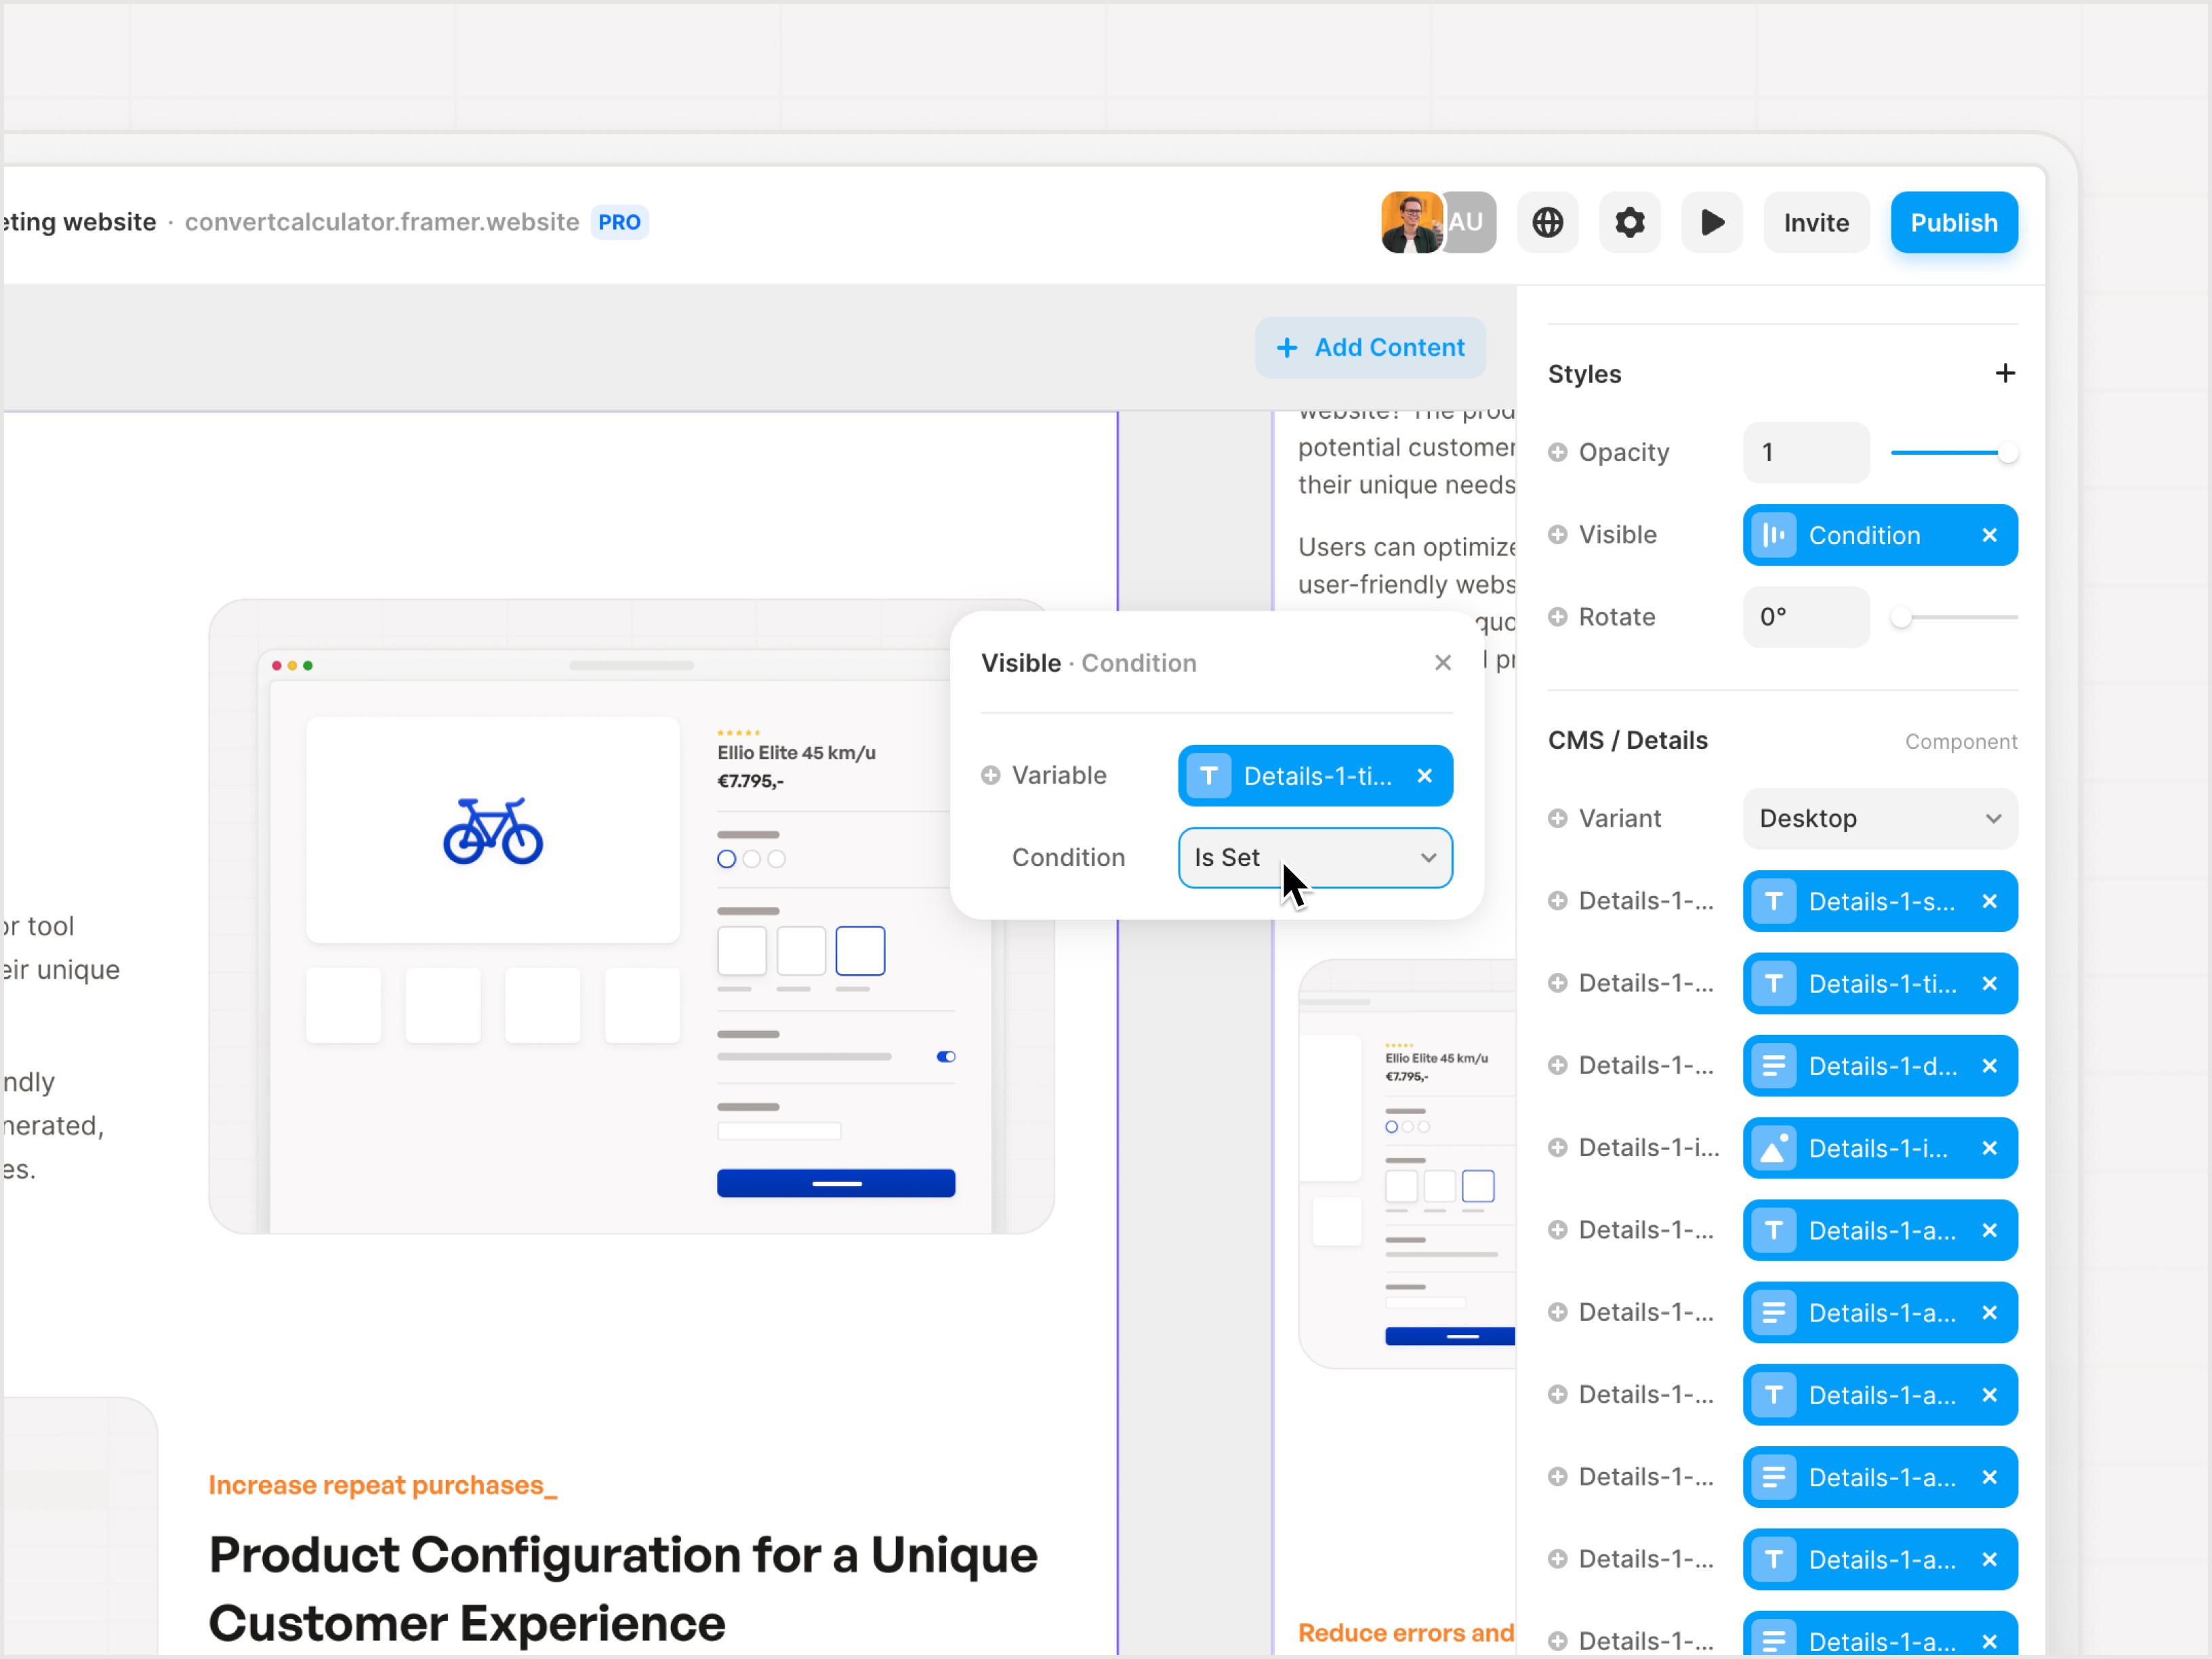
This setup has its drawbacks: we had to create 120+ CMS fields times 4 CMS collections, map them to layers in our components, and set up the visibility logic. This setup looks quite complex in the CMS fields overview, when editing a page in the canvas or mapping the fields.
We demonstrated the challenges we faced to a Framer engineer, who assured us that these issues would be addressed and improved.

When creating or editing a page in our CMS, we now have a big list of predefined fields we have to go through or skip when we don’t need to fill them for a specific page. This made it a bit hard for others to get started using the CMS, but once somebody understood the setup, it became fairly easy to work with. For example, it took our content writer Emma only an hour to get up to speed in migrating the content from our old system to our new CMS.
Now we have this set up and running, it helps us create visually appealing pages, rendered based on CMS content, that are more consistent, but still uniquely created for the specific content group we want to create. Making changes to or extending this setup is still really easy.
Take a look at some of the pages:
Use cases → Product Configurator
Use cases → Price Quote Calculator
Use cases → Interactive Calculator
Platforms → Framer
Platforms → Webflow
Challenge 3: Build a table of contents for dynamically generated blog posts from the CMS
All of our blogpost pages are dynamically created and served from the CMS. Some posts or guides, like this one, can get quite long, so we wanted to have a table of contents with all our H2 headers next to the post content to help readers navigate the content and find what’s important to them.
Framer doesn’t support generating a table of contents with ‘scroll to links’ based on the content of a specific CMS field. In the Framer Community, there are multiple posts by Framer users who created something like this, but none of the solutions had all the options we needed:
The possibility to style the active and inactive items within the table of contents in the Framer canvas
Style hover states from the canvas
Update the active and inactive items based on clicking an item in the table of contents
Update the active and inactive items based on the scroll position in the page, specifically: using the top of the viewport as an anchor for updating as this is where clicking an item (see 3) scrolls to, instead of the bottom of the viewport or a specific offset in pixels
Smooth scroll to another section when clicking an item in the table of contents
Add the ID of the currently selected section to the URL
Based on the solutions from the community, we created a custom React / JSX component to solve all these needs.
How to use this yourself
Create a new component in Assets in your Framer project
Give the component any name you want, like “Blog - Table of Contents”, give the Primary Instance the name “h2”
Add a text layer with the content and layername “Title”
Create a variant of “h2”, called “h2-active”
Add a hoverstate to “h2”
Style the components any way you want
Download the code component at the bottom of this blog post. Note, this component also includes our blockquote support from the section below in this post.
Create a new Code Override Component, paste in the provided code, and save it
Add the “Blog - Table of Contents” component to your canvas. In your Inspector, apply the Code Override you just added, and apply the Override “withTableOfContent”
Add your post content in a text layer on your canvas. Map this to the content from your blog CMS collection. In your Inspector, apply the Code Override you just added, and apply the Override “withContent”
Make sure there are one or multiple H2 headers in the post body. Test it out using the preview
Challenge 4: Missing HTML <blockquote> support in the Framer CMS
Besides not supporting a table of contents for CMS collections natively, it’s also not possible to add HTML <blockquote> elements based on the “Formatted Text” field in the CMS. On our old website, we used blockquotes heavily, especially within our customer stories.
We considered using images for the quotes, but this is bad for accessibility and SEO. Using separate CMS fields for blockquotes (with a structure like post body > blockquote > post body > blockquote > …) meant we had to break up our post body into multiple fields, which made our editor’s experience worse, felt bad for SEO, and made it hard to create a functioning table of contents for our post. Alternatively, we looked into using a custom Markdown component like the folks over at Basedash created. Even though this worked great, and gave us a lot of possibilities to style our post content visually, it meant that adding or writing content in the CMS was harder for certain people in our team because it forced them to write in Markdown instead of using the built-in visual editor. Also, we lost the option to add images and videos to the post body and had to upload them to something like Amazon S3 manually.
We ended up building our own Code Component as an extension of Framer:
As our posts aren’t using the HTML <h6> element, it meant we could hack the element to act like a <blockquote>. We wrote a script that takes the content of an <h6> and replaces the <h6>…</h6> tags with <blockquote>…</blockquote> tags. When you use ⇧ (shift) + enter to add linebreaks instead of normal breaks in the CMS, our script automatically adds a class to the new line within the h6 turned blockquote element, giving you the possibility to style each line in the quote individually using CSS. We decided to use this to highlight quotes with a vertical border and style the blockquote body, author, and the role of the author differently.
In this way, we can write the complete post in one Framer CMS Formatted Textfield.
One problem we’re facing is that we can do this hack only once, maybe twice: after that, we don’t have any unused header elements left, so it’s not the most scalable solution. We’re currently looking into the possibility of extending Framer’s syntax in the way WordPress uses ‘shortcodes’. We could, for example, get syntax like [quote content="Convert_ is awesome" name="Michael Bluth" role="CEO and President of the Bluth Company"] that transforms into a <blockquote> element.
How to use this yourself
Set up a Formatted Textfield in the Framer CMS, and add the text layer to the canvas.
Write an ‘H6’ by using the text-style selector or using
######MarkdownWrite the content of your blockquote
Press
⇧ (shift) enterto add a linebreak, and write the name of the person being quotedDownload the code component found at the bottom of this blog post. Note, this component also includes our table of contents from the section in this post above.
Create a new Code Override Component, paste in the provided code, and save it
In your Inspector, apply the Code Override you just added to the text layer with your post content.
Make sure there are one or multiple H6 elements with quotes in the post body. Test it out using the preview
Note on SEO and accessibility
This ‘hack’ is rendered server-side, so when adding a blockquote like this in your blog post body, the visitor of the page doesn’t notice this, and the <blockquote> element is in the code before Google even indexes the page. This means although the solution feels hacky, it produces semantically correct HTML that offers accessibility and performs great SEOwise.
Closing thoughts
Even though designing, building, and migrating all our content to the new website was a large project, we’re really happy and proud of how it turned out.
Besides all the custom components we coded to make it come alive, we made sure it was easy to embed calculators, forms, configurators, and other forms of interactive content in your Framer website with the native Framer Embed component – It’s as easy as dropping in the component and pasting one line of code. We use it ourselves throughout the website, for example on our Product Configurator page.
Do you want to create powerful calculators, quote forms, lead funnels, and more without code for your website? Start building for free using our platform Start with a template, or explore our Concierge Service to have yours built for you by our expert team.
Happy building!
When I joined the team last year and started working on improving parts of the existing website, we quickly realized we had outgrown the current website in terms of branding, content, design, editor experience, and expandability. This is especially true as we’re working hard on improving big parts of our core product and building out many new features.
We took a good look at what we wanted our messaging to be and built a new website that better communicates how you can build on-brand calculators, forms, and funnels that automate your marketing and sales efforts without having to code.
Building it using Framer helped us ship and iterate on it faster. Thinking about the strategy for our new messaging, redesigning and rebuilding a completely new website from scratch, and migrating all our existing content were done by just one designer and one content writer, with help from one of our co-founders. No engineers were needed—something that truly fits our ethos with our no-code builder at Convert.
Consideration 1: Using code or no-code
Redesigning and rebuilding a website is a huge project. Our website consisted of a React + Next.js stack, powered by our own CMS for our 100+ dynamically created pages that score great on SEO and help potential customers find our website.
For our new website, we took a hard look at how we wanted to build it. We mainly asked ourselves what was right for our business. We had three options:
Build a new front-end in-house and keep using the current CMS. To do this, we expected one of our engineers to work on the website for four to six weeks. As we’re a pretty small team and are building big updates to our core product, relocating engineering efforts didn’t feel like the right choice.
Hire a freelancer to build the front-end. This felt like a great option, but it was expensive, and we’d still need our engineers to expand or fix bugs on the website when needed. It would solve our first relocation problem but didn’t solve this in the long run as we’re not planning to grow our team significantly.
I design and build the website using a no-code platform like Webflow or Framer. This would mean no relocation of engineering, making the team smaller would help to focus on going fast and reduce alignment meetings. Using a no-code tool would also mean less time designing and more time figuring things out while building.
Option 3 seemed like the quickest and most scalable option, and as we’re in the no-code space ourselves, we knew that a good Webflow or Framer website would give us the same quality as building it ourselves.
Consideration 2: Webflow or Framer
While comparing Webflow and Framer, we noticed a big difference:
In Webflow, you’re visually writing CSS. It’s easier than writing code but feels as powerful. However, the learning curve of doing it visually still feels pretty high, and besides basic HTML concepts like the box model, you have to focus on a lot of web knowledge that you’re not focussing on in Figma. Framer seems to have built an abstraction layer on top of HTML, CSS, and Javascript concepts that look a lot like Figma. Their interpretation of CSS Flex (called Stacks) and Grid feels like you’re working with Figma’s Auto Layout, but generates high-quality code for you.
When building a website, you usually go through two steps:
Design
Build
It felt like Webflow moved the second step from an engineer to a designer. Framer, however, merged the two steps and improved my speed tremendously.
Before we went all-in on Framer, we wanted to be sure it could meet a few of our needs, so we built demos solving the challenges below.
Challenge 1: Preparing for SEO
The basics
SEO is a big part of our growth strategy. On our old website, we had lots of pages and links that ranked well and helped customers find us.
We quickly learned that Framer is great in doing the basic things that are important for SEO: generating sitemaps, structuring headers using HTML tags and using semantic HTML tags for content blocks like <nav>, <aside>, etc., and editing meta descriptions.
Custom meta titles and descriptions for CMS pages
Framer makes it easy to write dynamically created Meta Titles and Descriptions for CMS pages using CMS Variables. This is great because you can reuse content from your page to create unique descriptions.
For our website, we already had unique descriptions for each page. Even though it was more work, writing unique and descriptive copy helped our SEO. Framer doesn’t offer completely custom meta titles and Descriptions for CMS-generated pages. Still, it's possible to add a meta title and meta description field to your CMS collection and add them to the Page Settings using the Variables.
Lighthouse scores
Framer wrote a great guide on Lighthouse, Pagespeed Insights, the (SEO) performance toolset by Google, and interpreting its scores. After running several tests and fixing some scores, we found that Framer performs great for “Best Practices” and “SEO”:
“Performance” is hard to get high scores on, especially when you’re running the Lighthouse Chrome extension on mobile. Framer writes about this in their post linked above. The main reason for the lower scores seems to be all the Javascript that you can’t optimize yourself.
Ahrefs launch checklist and scores
Before we launched, we used this checklist from Ahrefs, which helped us ensure we covered everything important for great SEO.
After launch, we used the Ahrefs health check to find and solve all of our SEO issues: after some fixing, our new website scored 96%.
Of course, we have to wait to learn how Framer will work out for our SEO in the long run. We expect a dip in our ranking and traffic in the beginning, even though we read about companies like Whereby that saw an increase.
Challenge 2: Generate dynamic CMS pages using a lot of different components
On our previous website, we published a lot of dynamically generated CMS pages that were important for SEO. These were grouped as features, use cases, markets, and platforms.
We were able to create pages by stacking components appropriate to each group and filling them with content. This gave us a lot of flexibility to create layouts that responded to the page's content needs. It allowed us to create reader-friendly pages that weren’t too text-heavy.
We quickly learned that Framer doesn’t support this out of the box, so we created a workaround using page templates and conditional logic.
We started building a set of versatile components based on the content we already had on our old website. For each content item in the component, whether it’s plain text, rich text, a link, an image, video, or an inline calculator or form that’s built with our tool, we created a CMS field and mapped this to the layer on the canvas. Using Framer’s ‘Visibility Conditions’, we were able to create conditionals that checked if a specific field in the CMS was filled, and based on it being true or false, it showed or hid the layer or complete component in the canvas.
This setup has its drawbacks: we had to create 120+ CMS fields times 4 CMS collections, map them to layers in our components, and set up the visibility logic. This setup looks quite complex in the CMS fields overview, when editing a page in the canvas or mapping the fields.
We demonstrated the challenges we faced to a Framer engineer, who assured us that these issues would be addressed and improved.
When creating or editing a page in our CMS, we now have a big list of predefined fields we have to go through or skip when we don’t need to fill them for a specific page. This made it a bit hard for others to get started using the CMS, but once somebody understood the setup, it became fairly easy to work with. For example, it took our content writer Emma only an hour to get up to speed in migrating the content from our old system to our new CMS.
Now we have this set up and running, it helps us create visually appealing pages, rendered based on CMS content, that are more consistent, but still uniquely created for the specific content group we want to create. Making changes to or extending this setup is still really easy.
Take a look at some of the pages:
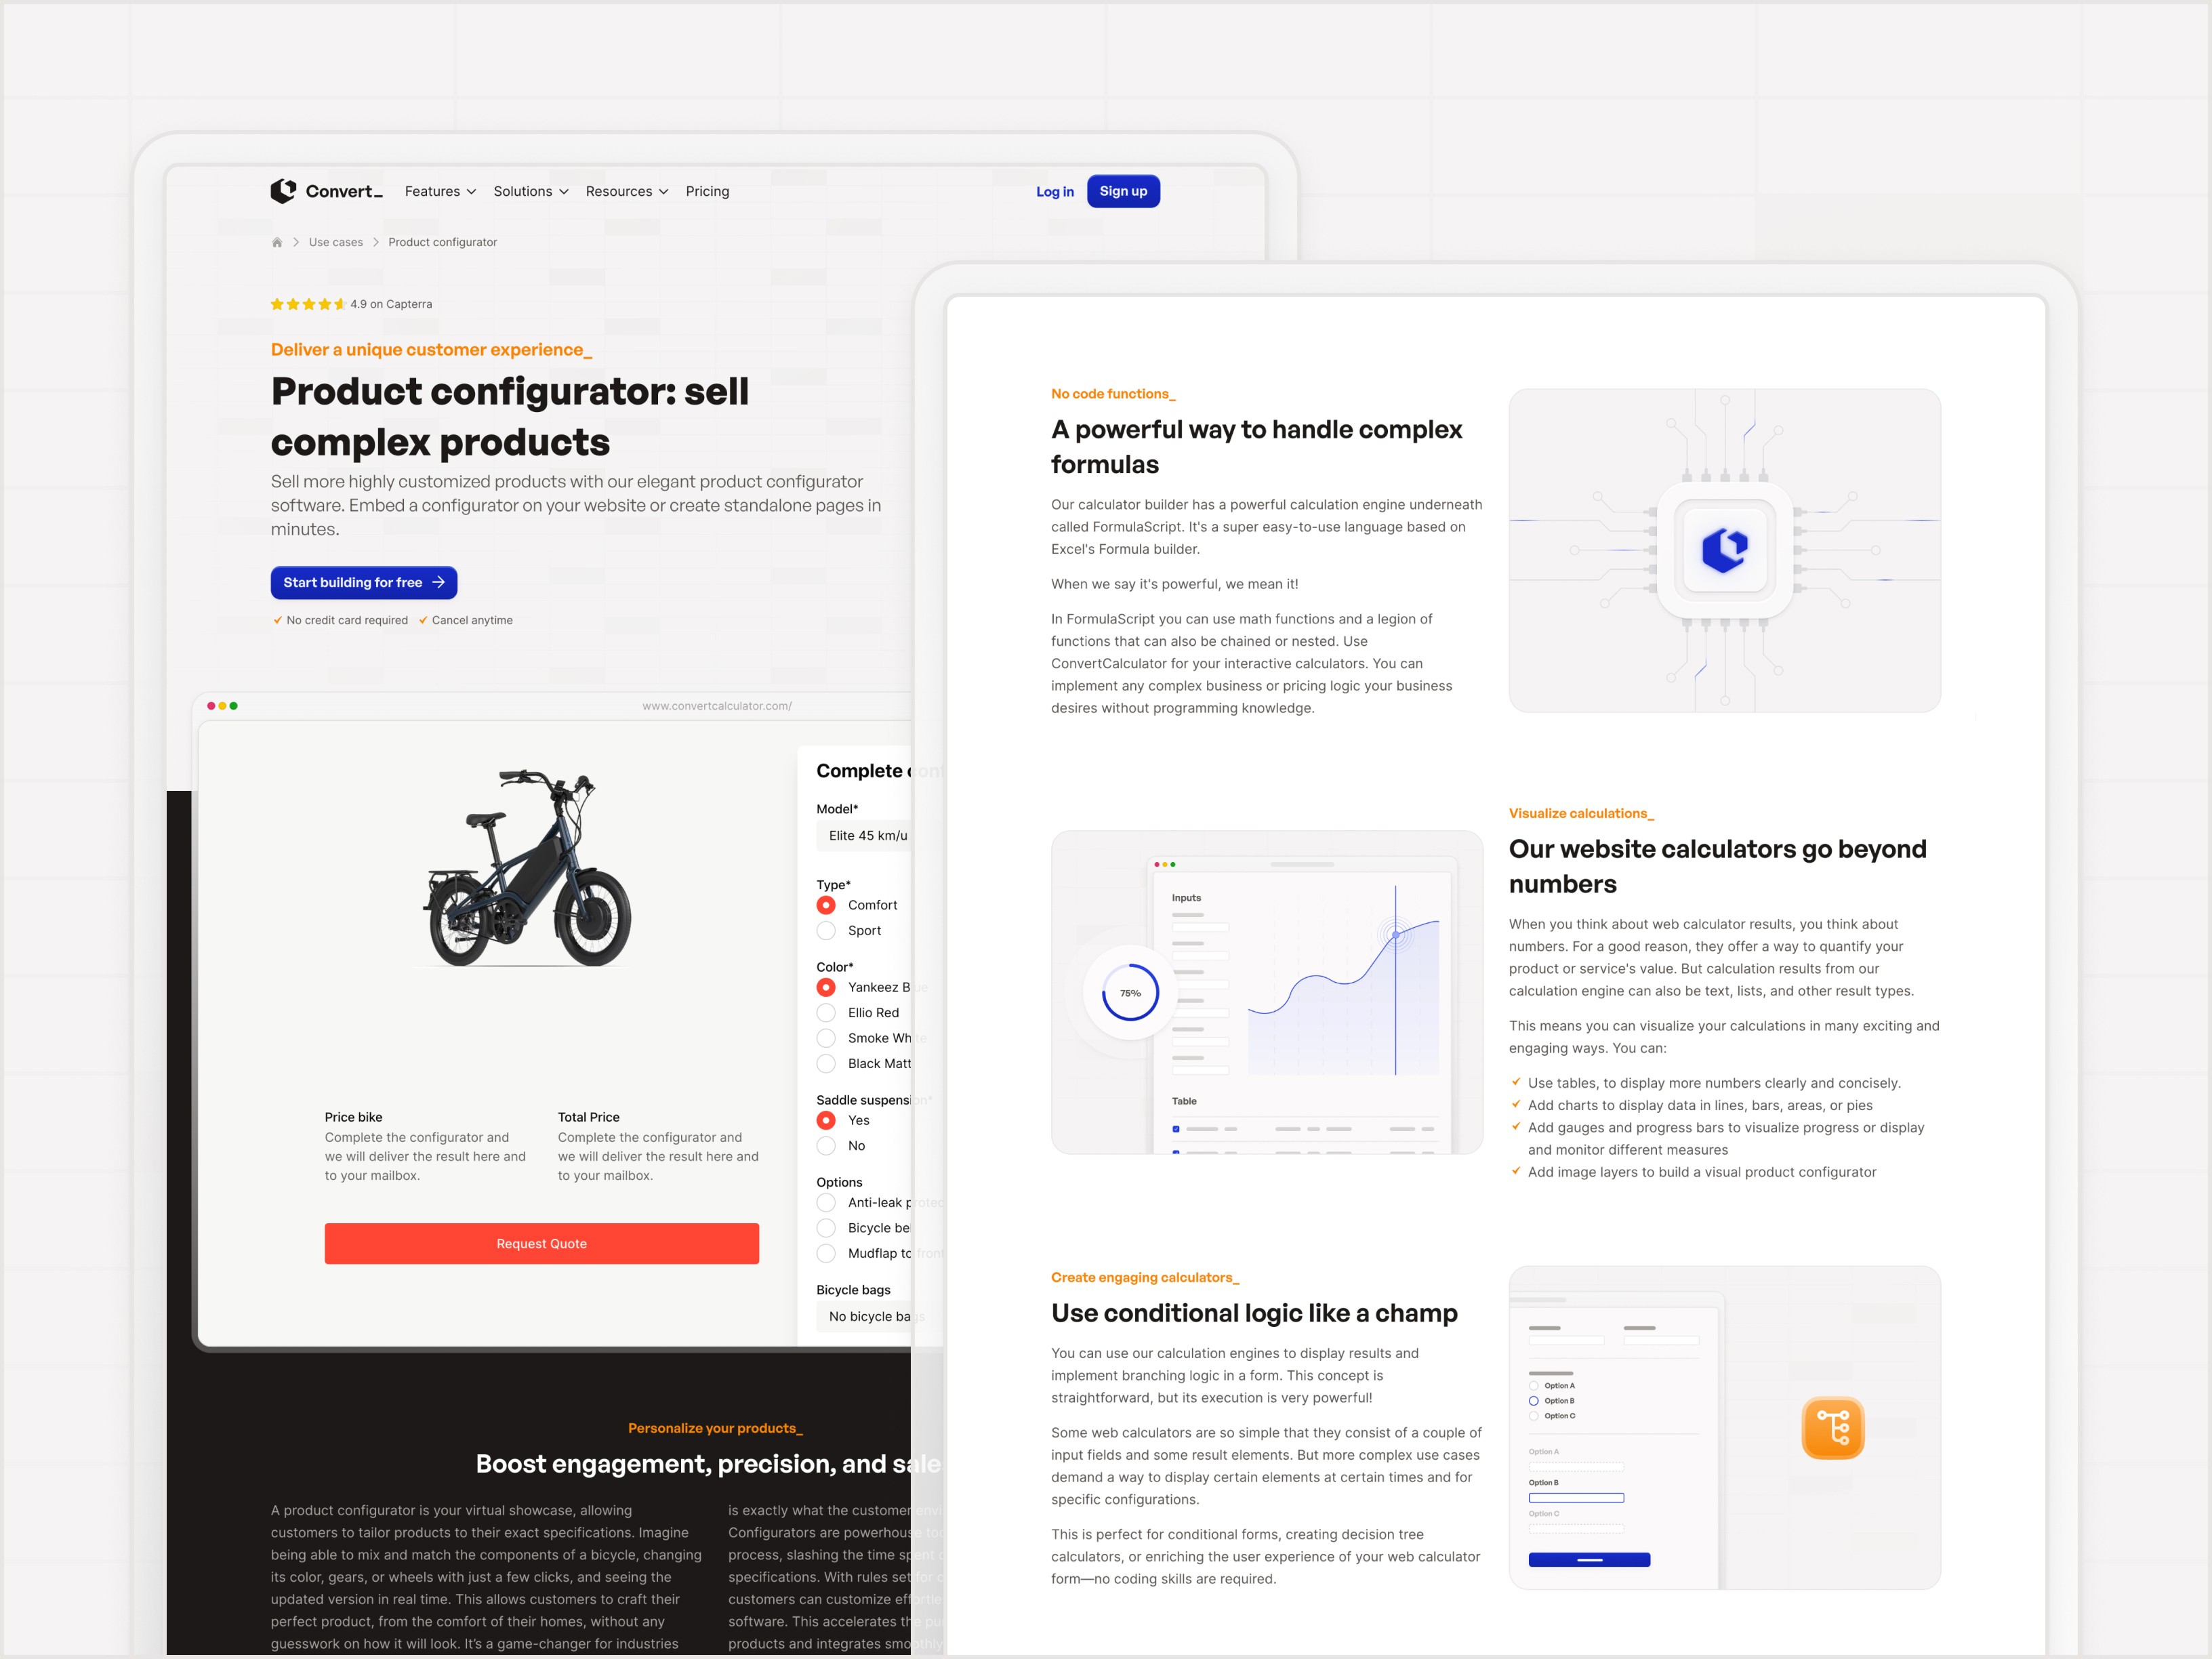
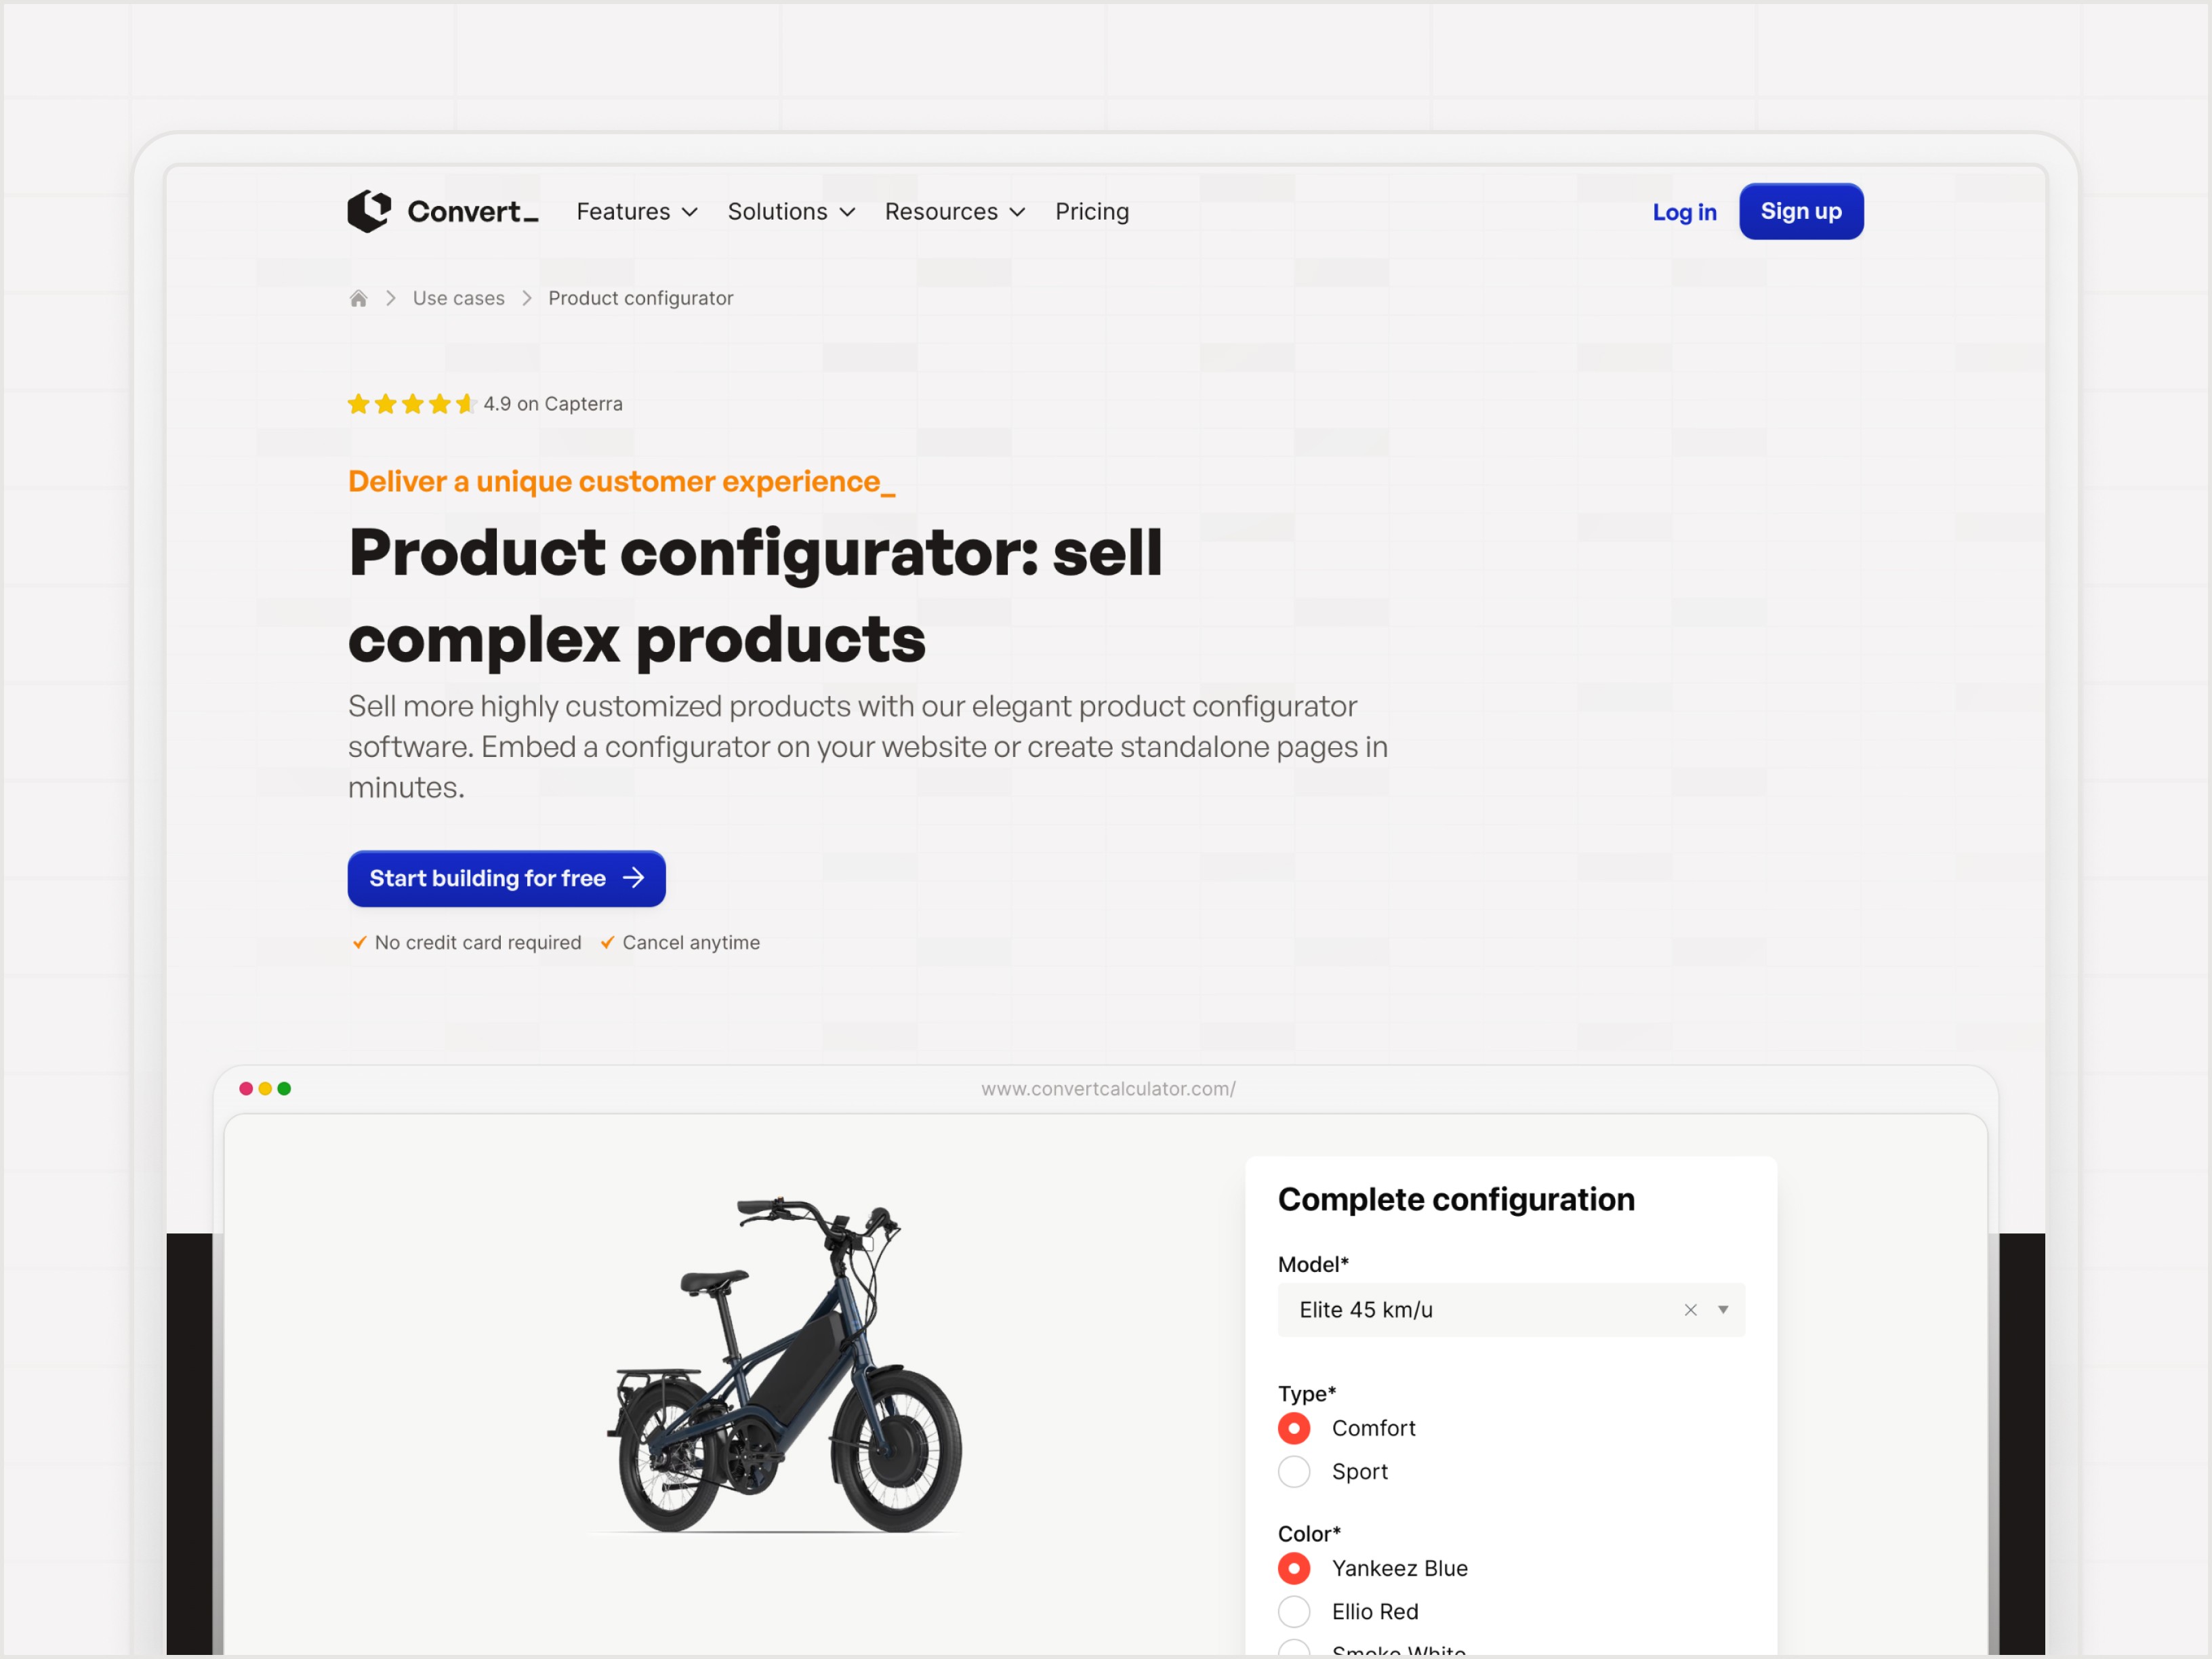
Use cases → Product Configurator
Use cases → Price Quote Calculator
Use cases → Interactive Calculator
Platforms → Framer
Platforms → Webflow
Challenge 3: Build a table of contents for dynamically generated blog posts from the CMS
All of our blogpost pages are dynamically created and served from the CMS. Some posts or guides, like this one, can get quite long, so we wanted to have a table of contents with all our H2 headers next to the post content to help readers navigate the content and find what’s important to them.
Framer doesn’t support generating a table of contents with ‘scroll to links’ based on the content of a specific CMS field. In the Framer Community, there are multiple posts by Framer users who created something like this, but none of the solutions had all the options we needed:
The possibility to style the active and inactive items within the table of contents in the Framer canvas
Style hover states from the canvas
Update the active and inactive items based on clicking an item in the table of contents
Update the active and inactive items based on the scroll position in the page, specifically: using the top of the viewport as an anchor for updating as this is where clicking an item (see 3) scrolls to, instead of the bottom of the viewport or a specific offset in pixels
Smooth scroll to another section when clicking an item in the table of contents
Add the ID of the currently selected section to the URL
Based on the solutions from the community, we created a custom React / JSX component to solve all these needs.
How to use this yourself
Create a new component in Assets in your Framer project
Give the component any name you want, like “Blog - Table of Contents”, give the Primary Instance the name “h2”
Add a text layer with the content and layername “Title”
Create a variant of “h2”, called “h2-active”
Add a hoverstate to “h2”
Style the components any way you want
Download the code component at the bottom of this blog post. Note, this component also includes our blockquote support from the section below in this post.
Create a new Code Override Component, paste in the provided code, and save it
Add the “Blog - Table of Contents” component to your canvas. In your Inspector, apply the Code Override you just added, and apply the Override “withTableOfContent”
Add your post content in a text layer on your canvas. Map this to the content from your blog CMS collection. In your Inspector, apply the Code Override you just added, and apply the Override “withContent”
Make sure there are one or multiple H2 headers in the post body. Test it out using the preview
Challenge 4: Missing HTML <blockquote> support in the Framer CMS
Besides not supporting a table of contents for CMS collections natively, it’s also not possible to add HTML <blockquote> elements based on the “Formatted Text” field in the CMS. On our old website, we used blockquotes heavily, especially within our customer stories.
We considered using images for the quotes, but this is bad for accessibility and SEO. Using separate CMS fields for blockquotes (with a structure like post body > blockquote > post body > blockquote > …) meant we had to break up our post body into multiple fields, which made our editor’s experience worse, felt bad for SEO, and made it hard to create a functioning table of contents for our post. Alternatively, we looked into using a custom Markdown component like the folks over at Basedash created. Even though this worked great, and gave us a lot of possibilities to style our post content visually, it meant that adding or writing content in the CMS was harder for certain people in our team because it forced them to write in Markdown instead of using the built-in visual editor. Also, we lost the option to add images and videos to the post body and had to upload them to something like Amazon S3 manually.
We ended up building our own Code Component as an extension of Framer:
As our posts aren’t using the HTML <h6> element, it meant we could hack the element to act like a <blockquote>. We wrote a script that takes the content of an <h6> and replaces the <h6>…</h6> tags with <blockquote>…</blockquote> tags. When you use ⇧ (shift) + enter to add linebreaks instead of normal breaks in the CMS, our script automatically adds a class to the new line within the h6 turned blockquote element, giving you the possibility to style each line in the quote individually using CSS. We decided to use this to highlight quotes with a vertical border and style the blockquote body, author, and the role of the author differently.
In this way, we can write the complete post in one Framer CMS Formatted Textfield.
One problem we’re facing is that we can do this hack only once, maybe twice: after that, we don’t have any unused header elements left, so it’s not the most scalable solution. We’re currently looking into the possibility of extending Framer’s syntax in the way WordPress uses ‘shortcodes’. We could, for example, get syntax like [quote content="Convert_ is awesome" name="Michael Bluth" role="CEO and President of the Bluth Company"] that transforms into a <blockquote> element.
How to use this yourself
Set up a Formatted Textfield in the Framer CMS, and add the text layer to the canvas.
Write an ‘H6’ by using the text-style selector or using
######MarkdownWrite the content of your blockquote
Press
⇧ (shift) enterto add a linebreak, and write the name of the person being quotedDownload the code component found at the bottom of this blog post. Note, this component also includes our table of contents from the section in this post above.
Create a new Code Override Component, paste in the provided code, and save it
In your Inspector, apply the Code Override you just added to the text layer with your post content.
Make sure there are one or multiple H6 elements with quotes in the post body. Test it out using the preview
Note on SEO and accessibility
This ‘hack’ is rendered server-side, so when adding a blockquote like this in your blog post body, the visitor of the page doesn’t notice this, and the <blockquote> element is in the code before Google even indexes the page. This means although the solution feels hacky, it produces semantically correct HTML that offers accessibility and performs great SEOwise.
Closing thoughts
Even though designing, building, and migrating all our content to the new website was a large project, we’re really happy and proud of how it turned out.
Besides all the custom components we coded to make it come alive, we made sure it was easy to embed calculators, forms, configurators, and other forms of interactive content in your Framer website with the native Framer Embed component – It’s as easy as dropping in the component and pasting one line of code. We use it ourselves throughout the website, for example on our Product Configurator page.
Do you want to create powerful calculators, quote forms, lead funnels, and more without code for your website? Start building for free using our platform Start with a template, or explore our Concierge Service to have yours built for you by our expert team.
Happy building!
Related links
Some resources you might find useful:
Related links
Some resources you might find useful:
Related links
Some resources you might find useful:
Continue reading


More leads in less time_
Start building the future of your company, today
Create powerful on brand calculators, lead generation forms and apps that automate your marketing and sales processes
Start with a template
Find inspiration or customize an outstanding template, complete with functional formulas and flows to help you get started.
Let us build for you
We can build your calculator, and afterwards you can always make changes yourself. Our service starts at just $250.